The Best Modular Character Workflow With Aseprite
Hi everyone, this blog is a little different from the rest, this is a tutorial post. Meaning that if you have no interest in implementing a modular character system using Aseprite, then you can skip this one, I won't judge you.
What is a Modular Character System?
It is a system in games where a character does not exist as a single graphic, but as many separate graphics or modules. In this blog, we'll specifically be using a humanoid character and look at how we can visually 'equip' different clothing, glasses, and even hair styles using Unity and Aseprite. By the end of this tutorial, you'll be able to swap helmets, hairstyles, and clothing on a single character rig with minimal code. And of course there are many many other use cases for this workflow, it doesn't need to be a character you use. Modular is the key word here, not character. With that said let me lay down the Aseprite basics.
How to setup Aseprite
In aseprite, you need to make sure every animation is a different tag and each 'module' that you want to trigger on and off is a layer. Take a look at this image.
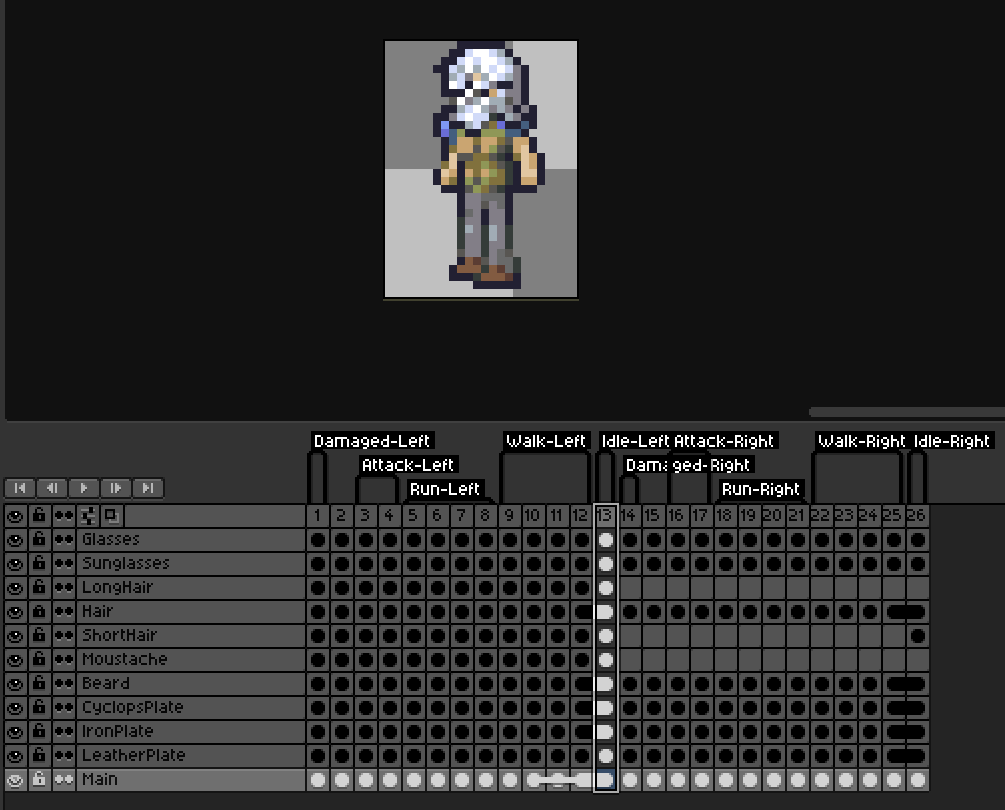
This is a screen capture of the aseprite file I made for the character in my most recent game jam submission. You can see each layer is either the character itself (Main) or some graphic that you'd want equipped. This is exactly how you want to make your aseprite file so that this workflow will actually work. Also it is important to keep those layer names nice and legible as you'll see, we need to use those later.
In Unity
First of all you need to go into your package manager window and make sure that you have Aseprite Importer installed, don't worry this is a package made and distributed by Unity themselves. After that, just drag your '.aseprite' file into a Unity folder and check it's import settings.
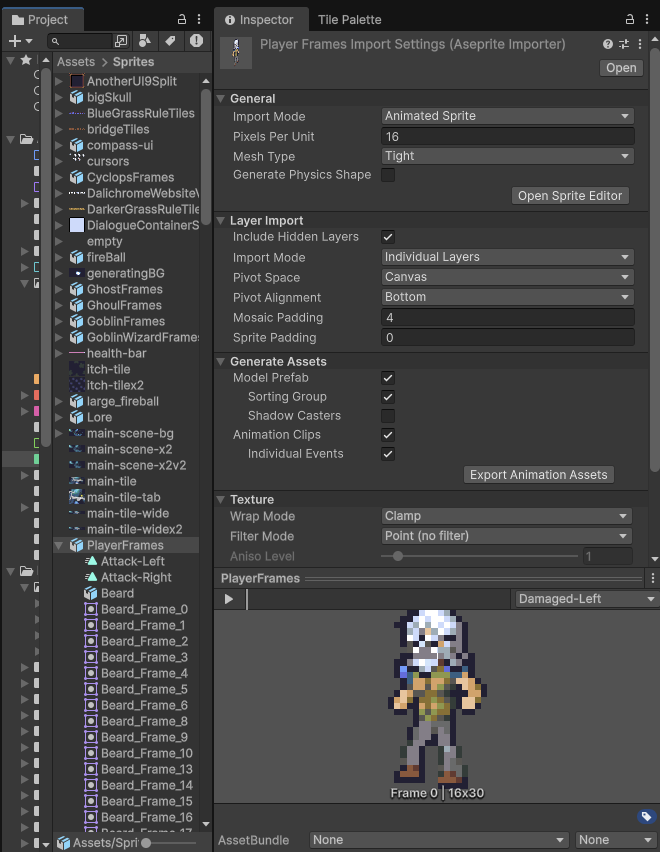
So this is not the default unity view, but you can see I have clicked my PlayerFrames.aseprite in the project view and now in the inspector I can see its import settings. What's important for us here is that we have 'Individual Layers' enabled and 'Animation Clips' enabled, then press that 'Export Animation Assets' button and export the controller somewhere in your project. That controller is independent of the aseprite file, so if you delete the whatever.aseprite file, the controller will stay around. The animation clips are a different story. If you export them, they will not change with the aseprite file anymore, so I recommend not doing that and using the ones the importer automatically creates (like Attack-Right in the project view of the above image).
Also, this tutorial is not about setting up an animation controller, but you will need to have one working and setup for use in this tutorial, so make sure you set up the one you just exported.
With that done you can now click on one of those clips and you should see something like this in the Animation tab:
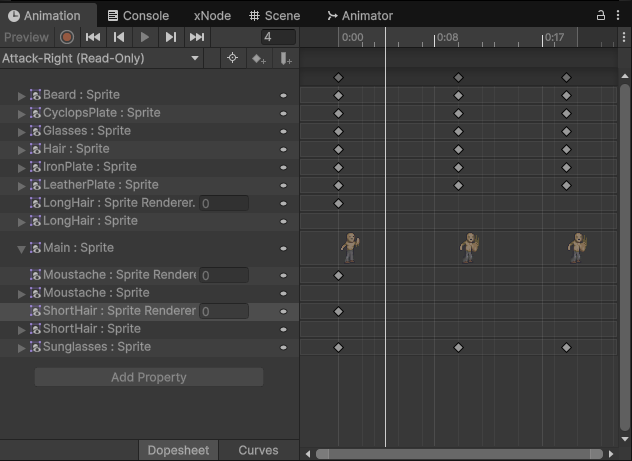
This can be a little confusing if you've never worked too in depth with the Unity Animation tab before, but Unity is now expecting different sprite renderers for each layer/module in the aseprite file. Specifically, it wants a sprite renderer named the same as the layer childed to object that has the animator component.
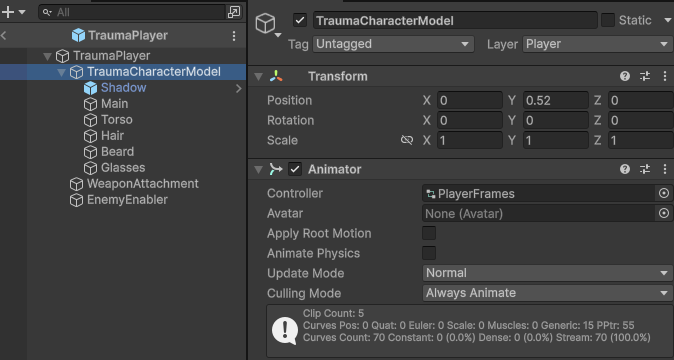
So the 'TraumaCharacterModel' has no sprite renderer, but its childed objects 'Main', 'Torso', 'Hair', 'Beard', and 'Glasses' all do. Now with this setup you have a zero code solution for modular characters in Unity, but there remains one big issue. Scalability, if you have 100 different modules, you need 100 different childed game objects, which feels obscene, because it is. So we need a little code.
The Coding
The solution to the scalability problem is simple. Rename a childed object to the layer you want to show and refresh the animator. If you do so you can reuse the same generic object for many different layers. Here is the simplest way I can express that in code:
layerGameObject.name = layer.name;
layerGameObject.SetActive(true);
GetComponent<Animator>().Rebind();
Of course, that only applies to one layer and one object, which creates another problem. What if you want to show modules concurrently like a separate object for helmet and chest-piece? In order to do that we need multiple generic objects. First let's call these objects 'slots'. Each layer needs to be associated with a slot. We can make two simple classes and an enum for the data we need to assign in the inspector.
public enum CosmeticSlotType
{
    NA,
    Torso,
    Pants,
    Head,
    Eye,
    Chin,
    Feet
}

[Serializable]
public class CosmeticSlot
{
    public CosmeticSlotType slot;
    public SpriteRenderer spriteRenderer;
}

[Serializable]
public class Cosmetic
{
    public string name;
    public CosmeticSlotType slot;
}
Then we can make a MonoBehaviour to attach to the player.
public class PlayerCosmetics : MonoBehaviour
{
[SerializeField] private List<Cosmetic> cosmetics;
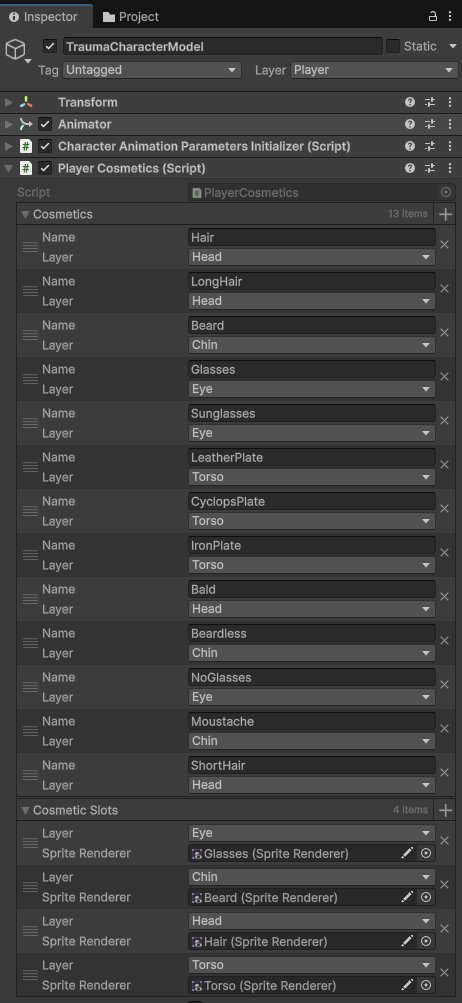
[SerializeField] private List<CosmeticSlot> cosmeticSlots;
...Go back into Unity, attach the script, and then type each layer name from Aseprite carefully into the inspector.
Once you've done that head back into the code and we can add some data structures.
public class PlayerCosmetics : MonoBehaviour
{
    [SerializeField] private List<Cosmetic> cosmetics;
    [SerializeField] private List<CosmeticSlot> cosmeticSlots;
    private Dictionary<CosmeticSlotType, CosmeticSlotInfo> slotInfoDict = new();
    private Animator animator;

    private class CosmeticSlotInfo
    {
        public CosmeticSlotType slot;
        public List<Cosmetic> cosmetics;
        public SpriteRenderer renderer;

        public GameObject GameObject { get { return renderer.gameObject; } }

        public CosmeticSlotInfo(CosmeticSlotType slot)
        {
            this.slot = slot;
            cosmetics = new ();
            renderer = null;
        }

        public void AddCosmetic(Cosmetic cosmetic)
        {
            cosmetics.Add(cosmetic);
        }
    }

    private void Start()
    {
        animator = GetComponent<Animator>();
        CreateCosmeticSlots();
    }

    private void CreateCosmeticSlots()
    {
        slotInfoDict = new();

        foreach (CosmeticSlotType slot in Enum.GetValues(typeof(CosmeticSlotType)))
        {
                slotInfoDict.Add(slot, new(slot));
        }

        foreach (Cosmetic cosmetic in cosmetics)
        {
            if(slotInfoDict.ContainsKey(cosmetic.slot))
                slotInfoDict[cosmetic.slot].AddCosmetic(cosmetic);
        }

        foreach (CosmeticSlot slot in cosmeticSlots)
        {
            CosmeticSlotInfo info = slotInfoDict[slot.slot];
            info.renderer = slot.spriteRenderer;
            slot.spriteRenderer.sprite = null;
        }
    }
    ...
Now we have a dictionary where we can put in the cosmetic slot type and get back the actual slot class. With that working, all we need to do is to receive a cosmetic class and...
    public void SetCosmetic(Cosmetic cosmetic)
    {
        CosmeticSlotInfo slot = slotInfoDict[cosmetic.slot];
        slot.GameObject.name = cosmetic.name;
        animator.Rebind();
    }
Now we can easily swap between different layers in one slot! We can also define a lot of slots and have hundreds of animations per slot, but still only have a limited number of game objects!
If you want to test it, try adding something like this to 'Awake':
private void Awake()
{
    Cosmetic newCosmetic = new();
    newCosmetic.name = "AsepriteLayerName";
    newCosmetic.slot = CosmeticSlotType.Head;
    SetCosmetic(newCosmetic);
}
Conclusion
I was really excited when I implemented this during a jam as I had no clue that modular character animation could be this easy! The code I've provided is way less than 100 lines and it gives you all you need for the simplest version of a working system. Of course there are more professional implementations than enums and dictionaries, like having your own scriptable object item class in your resources folder that you hook into instead. But, I'll leave that to you to figure out. So let me know if you guys end up using this in your games and sign up to my website if you want more of this stuff or look at some of my other blogs.
Thanks!