Making A Graph Based Random Generator

So recently I participated in the 2025 Game Maker's Toolkit Game Jam (link to the blog on that) and in preparation for that event, and for use in my in-progress game, I made some significant changes to my random generator package. Now as it stands I view this random generator as my technical mangum opus, it's a complicated project and the architecture is the best I've ever designed. Although I was proud of it, prior to the changes I'm about to layout, it lacked several key features that would make it impossible to use in production. But before I get into why that is, since this is going to be a more technical post, I've decided to break it up section by section more cleanly so that readers can skip to different parts easily. So skip it if you want, I'll start with describing terminology you should know so that we can all be on the same page.
Terms
So first, let's go over the terms I use for the data structures that store the generated data.
Data Storage Terms
Tile - The smallest unit in a tile grid, it contains an x and y coordinate and a tile type for each tile layer. Think of it as representing a small square of terrain that can define anything from a square foot of sea to a square foot of mossy castle walls.
Tile Grid - The actual grid that contains all the tiles. The grids in my generator can have variable width and height, but cannot stretch infinitely.
Map - Is just another term for tile grid.
Generation - Another name for a map or tile grid, something output by a generator.
Tile Type - The actual data that defines what's in a tile. A tile type could be grass, or tree, or anything that can generate really. Each tile type is restricted to only being placed in a specific tile layer.
Tile Layer - Inside each tile there are layers, such as ground, wall, object, and debug (these are the current layers I have). Imagine each layer like a 2D plane, each layer renders on top of the previous. Each tile only contains one tile type for each layer.
Generation Operations
Okay now that we have an idea of my implementation of the tile grid, let's talk about how we create them.
Generator - The algorithm used to place or modify tiles on an existing tile grid. An example would a noise generator, which the user gives a tile i.e. grass, and it places it at a random amount, outputting something visually similar to a grassy TV static.
Grid Operation - An algorithm used to do something with a tile grid. A generator is a grid operation, but as you will see later there are many types of grid operations that are not generators. What's important is to realize this is the umbrella term.
Tile Masking - The process of including or excluding certain tiles types from being modified by generators.
Generation Config Stack - In the old linear model of generation, this would be the information that told the random generator exactly what to generate.
Operation Config - The set of variables that tweak specific parts of a grid operation. They are serializable and are used to save specific generation information.
Random Generator - This is the short-hand version of 2D Random Terrain Generator, it refers to the entire program that makes random terrain.
Recap
So, as I said this blog is about an update to an existing package. That's right, in fact I've already used it in the same jam last year! So, I'm not making a new random generator, but I'm modify the same one. It's important to know that the random generator at this point existed in two different parts. One was the package that housed all the actual generation logic that existed to be added to different unity packages via the package manager. The second was a separate Unity UI project that had its own front end that allowed users to see, test, and modify their generations.
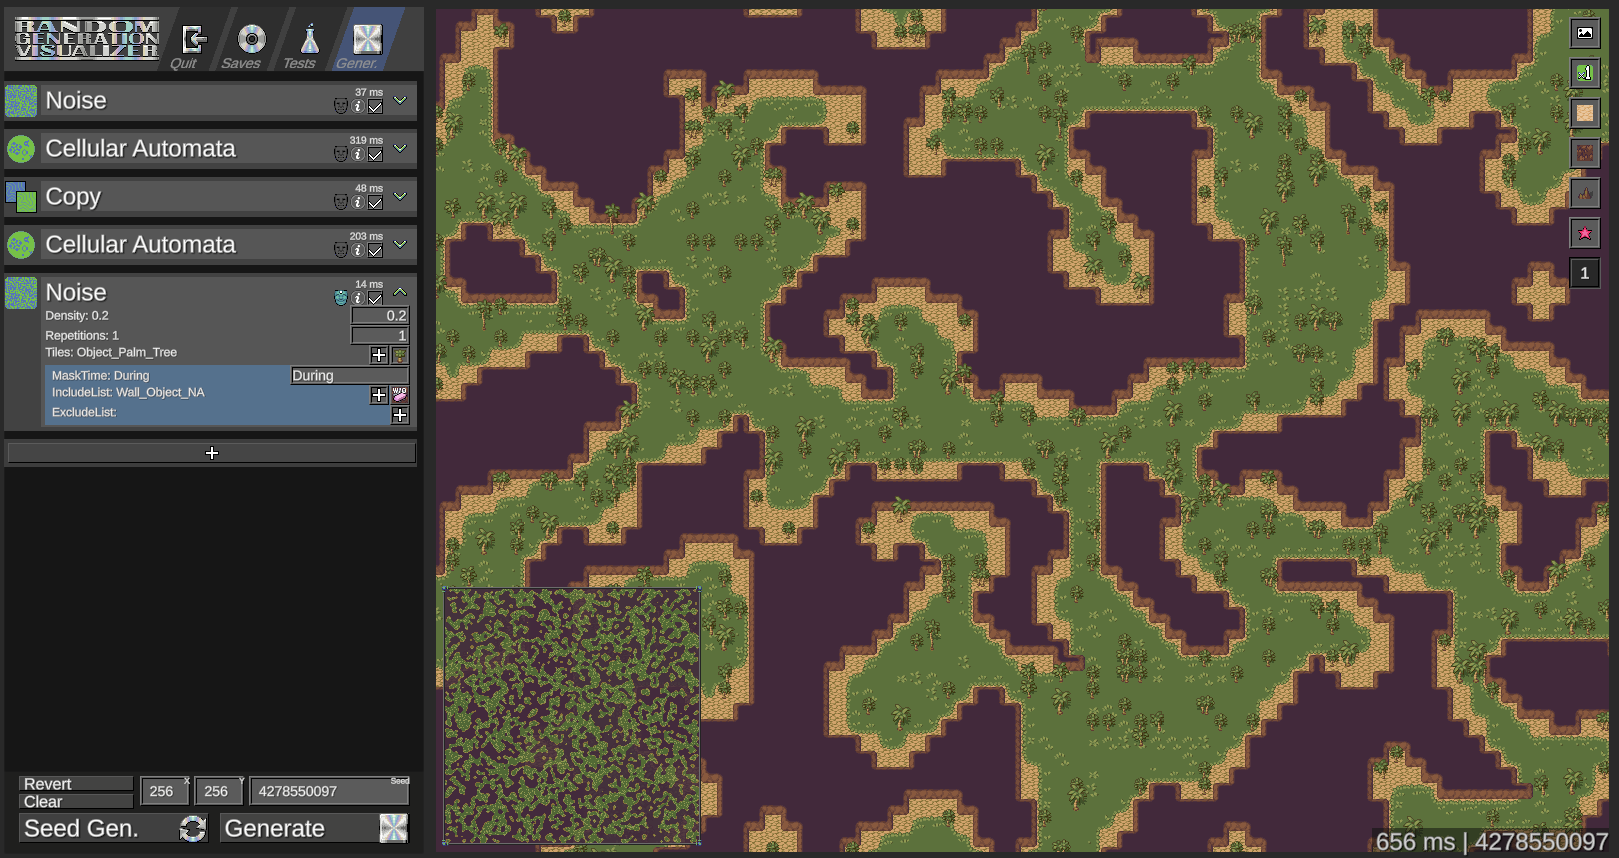
The UI application could also export certain generation data as json, which then you could load into other unity projects and just import config stacks that you had tested fairly easily. But this blog post is only about updating the package side of the project.
Problem
So that sounds pretty good, so what's the issue? The answer is pretty straightforward, it could not generate 'regions'. I didn't realize it when I was initially making the random generator, but regions are insanely important. Just think about how regional terrain is in real-life, seas, hills, mountains, beaches, cliffs, forests, jungles, swamps, etc. Imagine you just had only one of those, and that was basically what my generator could handle. You could make any one of those 'biomes,' but only one. So, I don't think its an overstatement to say that a random generator without regions is missing the core feature that makes maps interesting or engaging the first place. Now the technical reason why I couldn't create regions was I was using a stacked based config system, that had each generator resolved sequentially in order. This meant there was no way to split off a section of the map and run different generators on that section. So in order to make a good random generator that could make interesting maps, I had to design a new system that could do this.
Design
So it might sound complicated, but the high-level design changes are actually really simple. I wanted to take the linear stack based config system and transition to a graph based config system. This is would allow for multiple branching paths of generation and enable 'regionality' in generation most importantly.
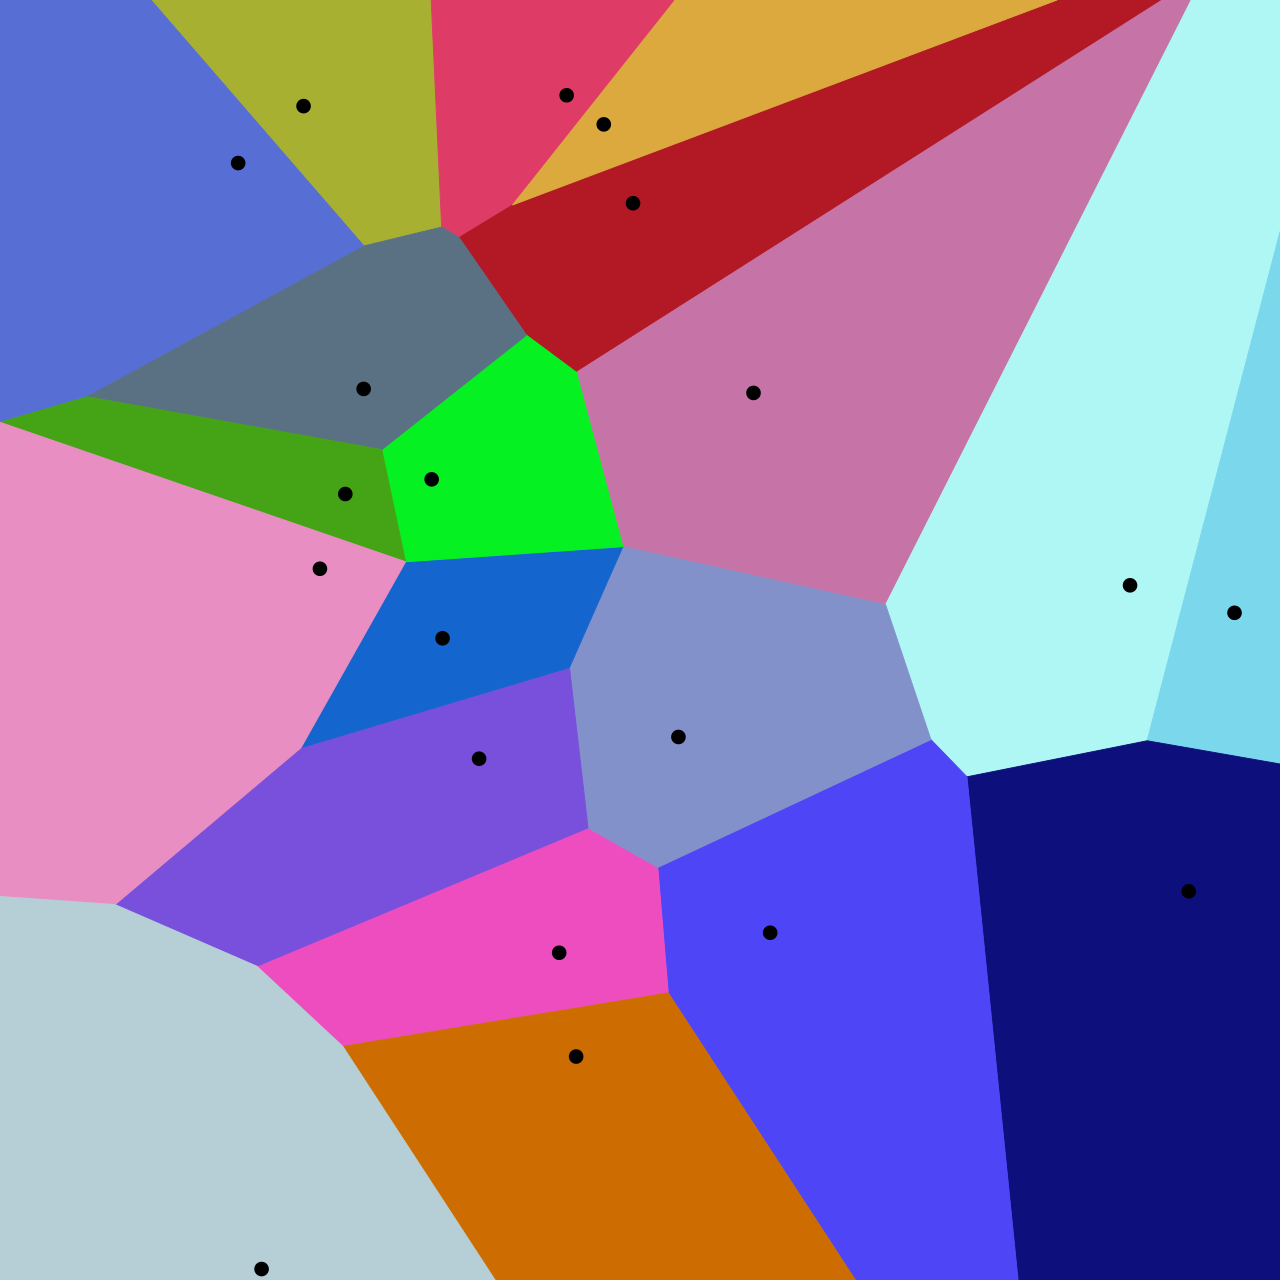
But as the generator stood then, the only type of grid operations were generators, which take in a tile grid and spit out a different tile grid. So I needed several new grid operations in order to enable this regional generation workflow. Firstly we need an operation called 'splitters' that split the tile grid into different regions. A good example of a splitter algorithm is the Voronoi algorithm, which without going into specifics creates very geometric cellular regions.
Then we needed 'filters' these are a bit unique as they don't change tile grid directly, but instead take all the different 'splits' or different regions from the splitter then select a subset of those then apply them to the tile grid. This makes it so that the next generators can only modify the regions that the filter returned. Then finally are the 'joiners' that take different 'lines' of generators then join them together, think of like a 'git merge'. These lines of generators are the different generators that run off of a filtered region after a splitter then a filter, you can think of them as the region specific generators.
But I needed more than just these new operations, I needed to define a graph structure as well to put these operations in and then have some sort of UI that allowed me to make and modify them easily.
Execution
I thought the UI was the likeliest point of failure, so I started from there, thinking I could back off if I needed to. I knew coding a UI from scratch was out of the question, so I knew that I needed to find a perfect package that met all my needs.
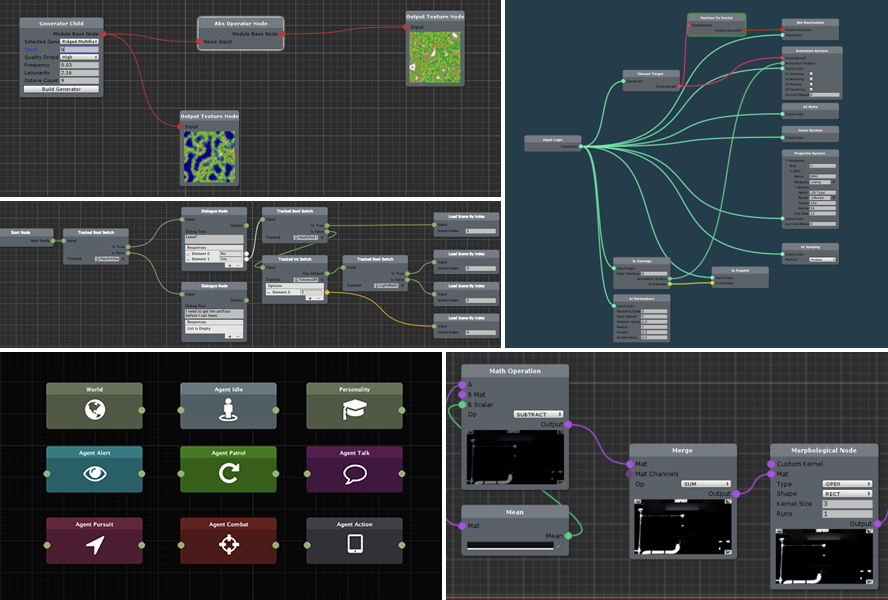
XNode
Sometimes the solution just exists. The package I found, XNode, was the perfect fit. It's a open source package that allows you to extend their node and graph classes to leverage their built-in UI.
After I found it, I started with verifying that I could actually use it, by making the class GeneratorNode that extended their node class and GeneratorGraph that extended their graph class. Not only did it work, but it worked much better than I expected, within a couple weeks I was able to define a graph where each node was a config for a grid operation in the XNode UI. I was even able to write abstract classes that handled most of the logic for every node tied to a grid operation, meaning that I only needed one class per operation type not for each implementation. The abstraction worked so well that any new operation, when its added, automatically gets full UI support - no code needed.
It was a slim and fast solution and I couldn't have been more surprised. Now that the UI was complete, I need to actually implement the traversal of the graph I had just made.
Traversal
To actually generate a map, the random generator needs to move through generator graph and each operation must run in the correct order (Not doing parallel generation yet). Well, what is the correct order? The most obvious answer is we need to move from the start of the graph to the end. So I added some start and end nodes to the graph. A linear graph would just be a line of generators connecting start to finish. So the most simple traversal is run each node in order from start to finish.

But we want to really leverage branching paths, that's the whole point of this feature and this blog. So let's add a branching path to that.
So take a moment and think logically, how we want to move through this? We have two branching paths, so the biggest difference now is we can't run left to right anymore. The nodes after the joiner have to run after all the generators to left of it run. The way I handled this was by thinking of joiners like sort of a video game water puzzle.
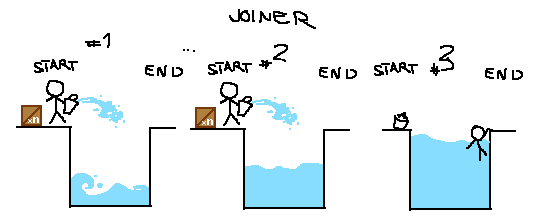
So each time you get to the joiner, you bring a bucket of water and fill up the pit a little bit more. When the pit is full, you swim across easily. But where does the water come from?
Well I like to think of splitters as something a little bit more complicated, imagine a ledge you can get down, but not back up that also has a well at the bottom.
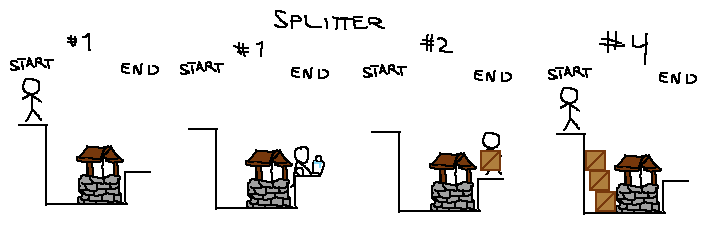
A splitter is just like that, the first time you get to one, you can cross no problem, nothing needed. Then you take a bucket of water from the well, so when you find a water puzzle / joiner you can fill it up. Of course you don't have enough water on one go to fill the joiner, but look at the joiner diagram again, you can grab a box from the joiner then come back and place the box, get more water. This exchange is the basic back and forth of the traversal logic. Going forward with buckets and going backwards with boxes. Eventually you'll be able to cross the joiner and all will be well. But this doesn't explain why you'd want to bring boxes to go back past a splitter in the first place. The reason you need to be able to do that is if you have multiple layers of splitters!

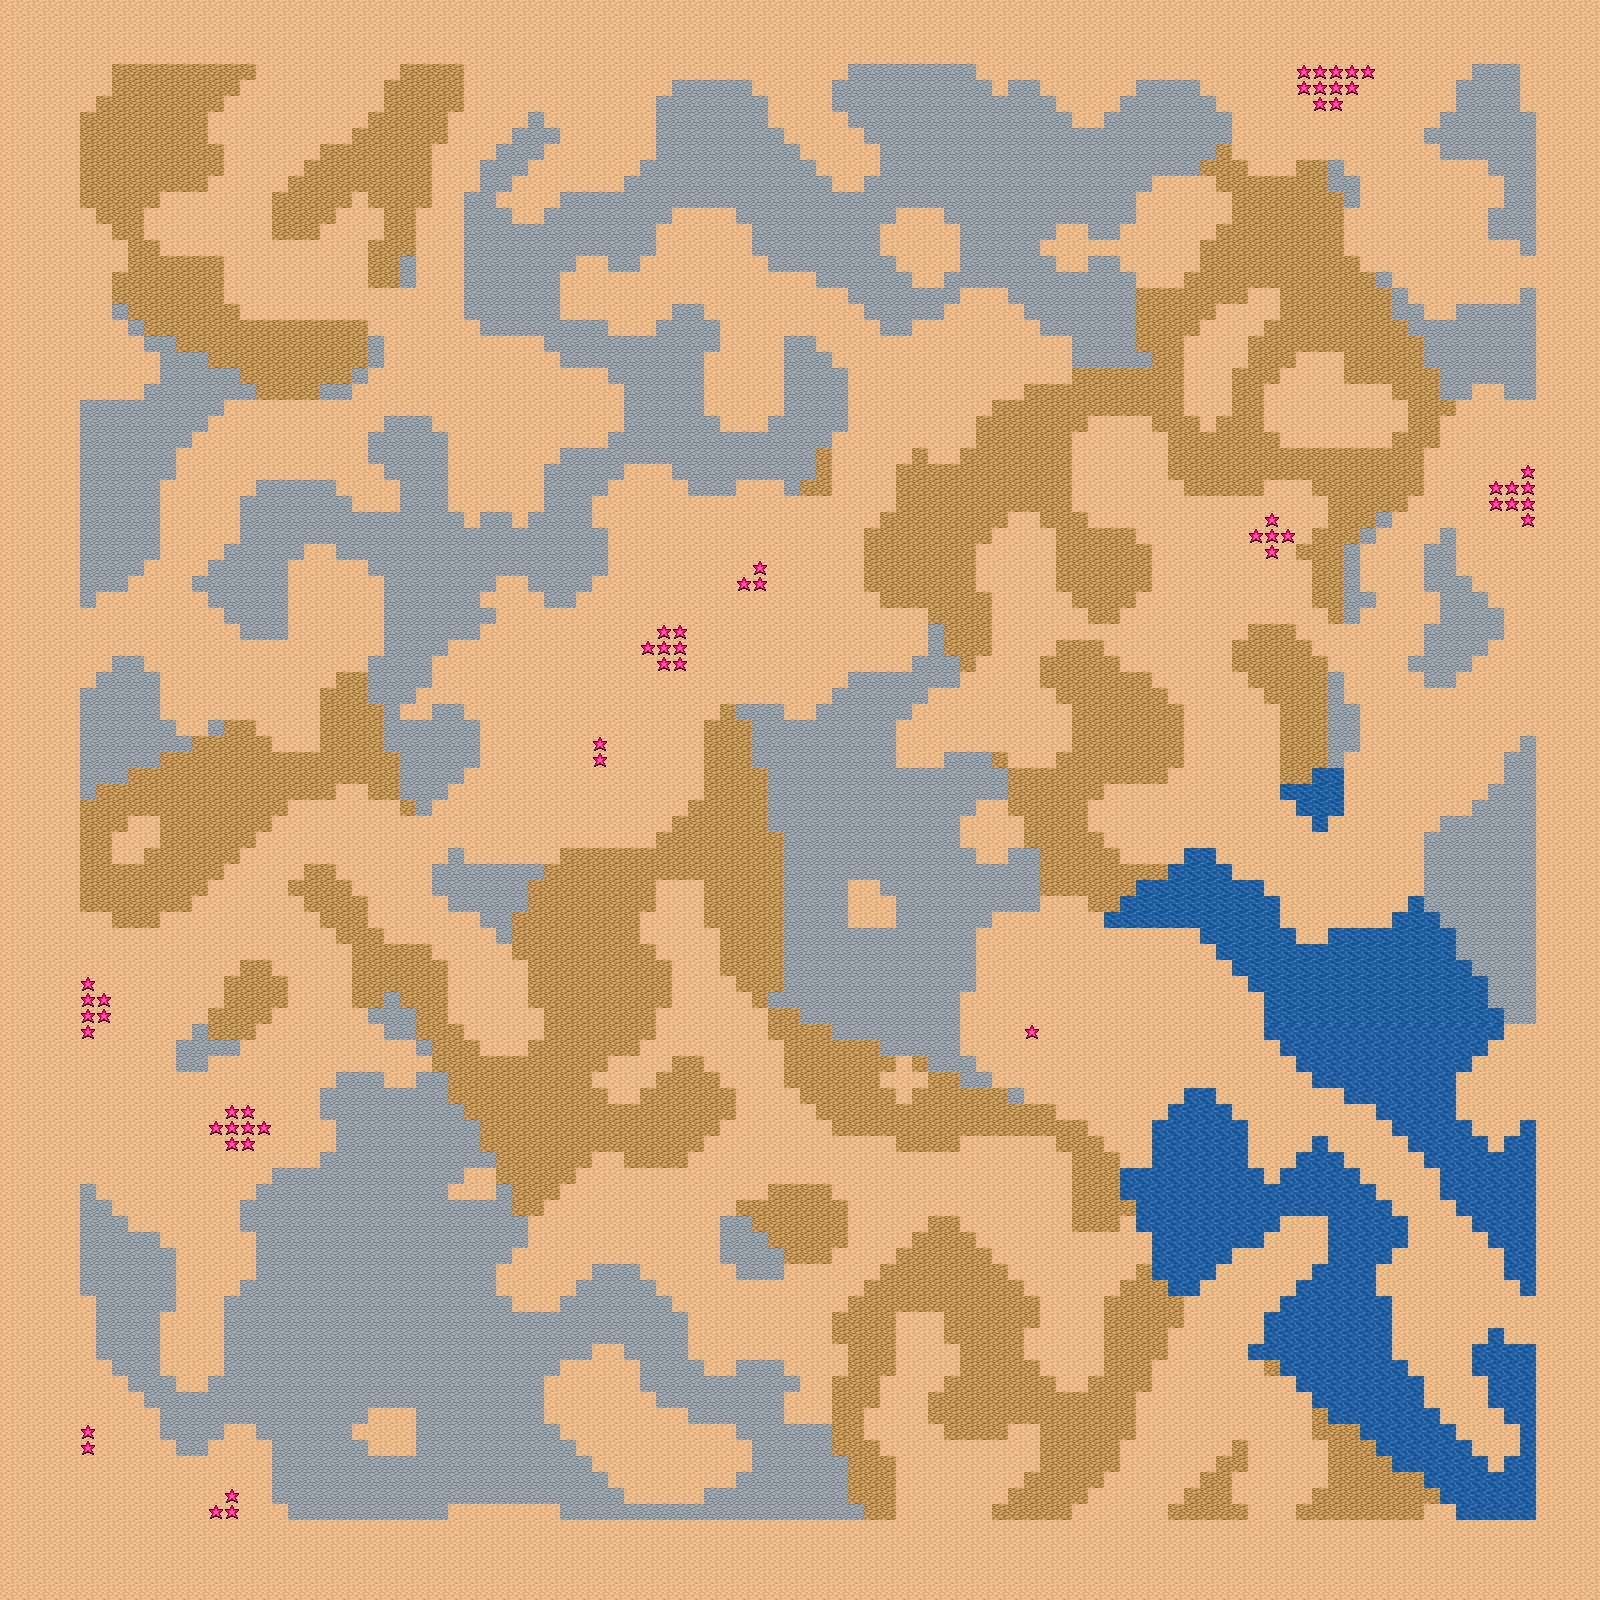
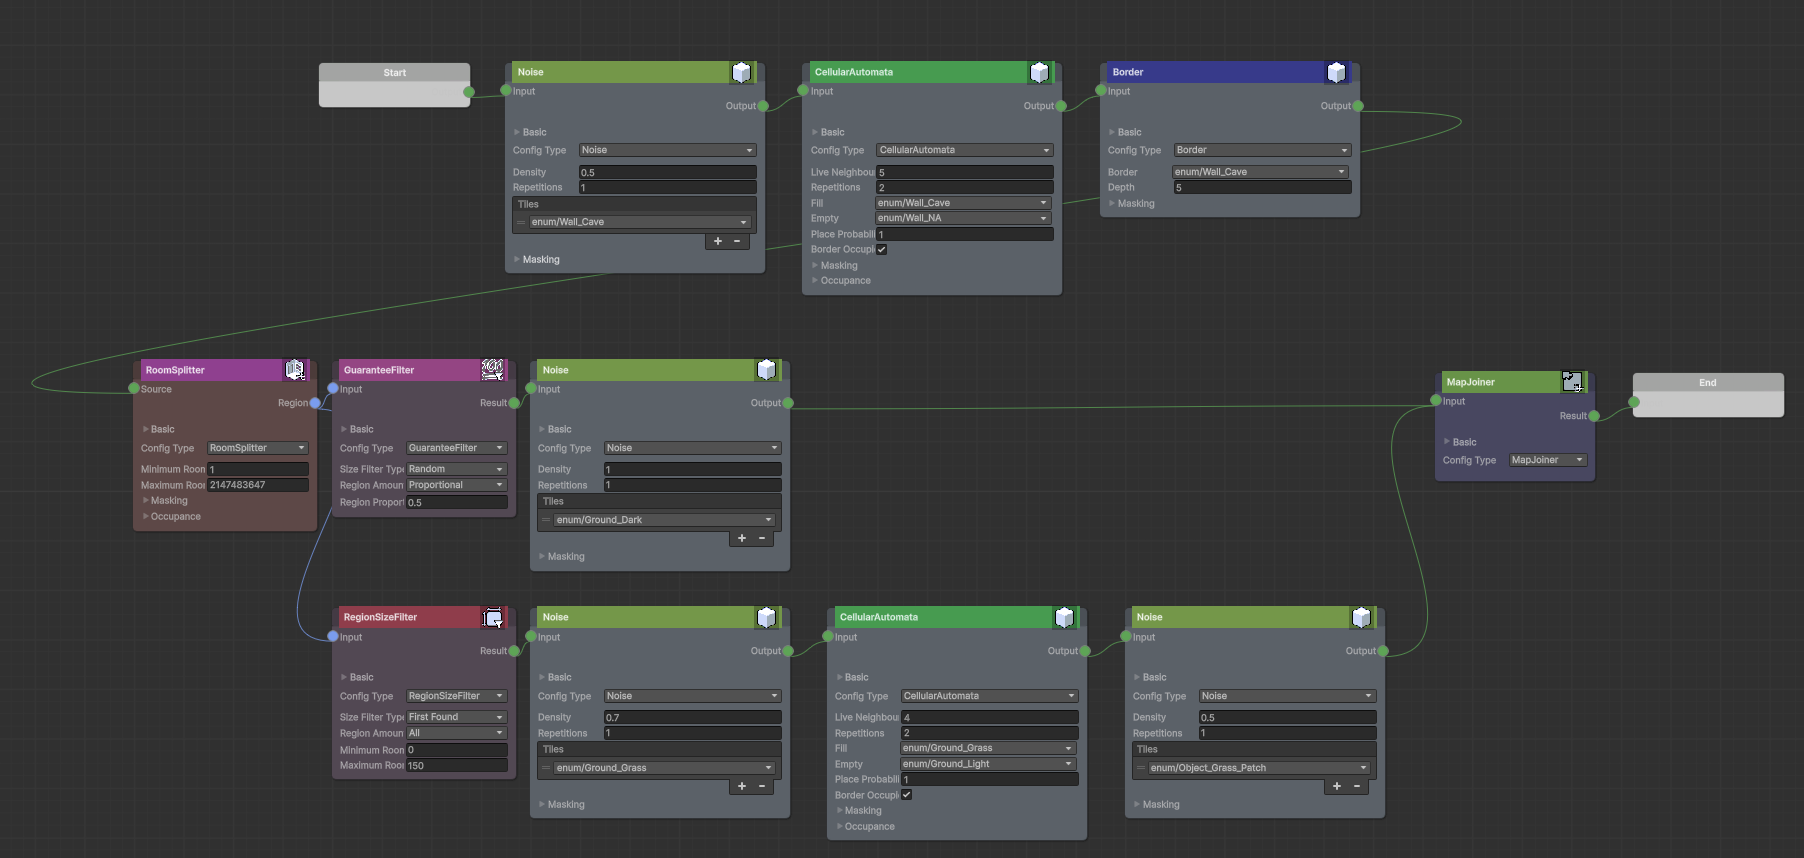
Generation Graph on the left with multiple splitters, a resulting map on the right
Yes, as you can see graphs can have more than one level of regions. You can split a region into smaller sub regions, so our traversal logic requires us to be able to handle any amount of splitters or joiners and any amount of sub regions. Now knowing that I think its pretty clear how you have to make your way back over a splitter at some point, to run a splitter further up.
I also understand that these images aren't a stand in for code which is much more precise. So I'll clarify that each splitter needs n boxes, n being the number of filters that branch off of it. Also there is only n buckets of water at each 'well' as well (har har).
Now the algorithm I described is also basically just a different form of DFS (Depth First Search), so I could've described it that way as well, but I personally found the imagery resonated with me more. Also it's a bit more fun that way.
Result
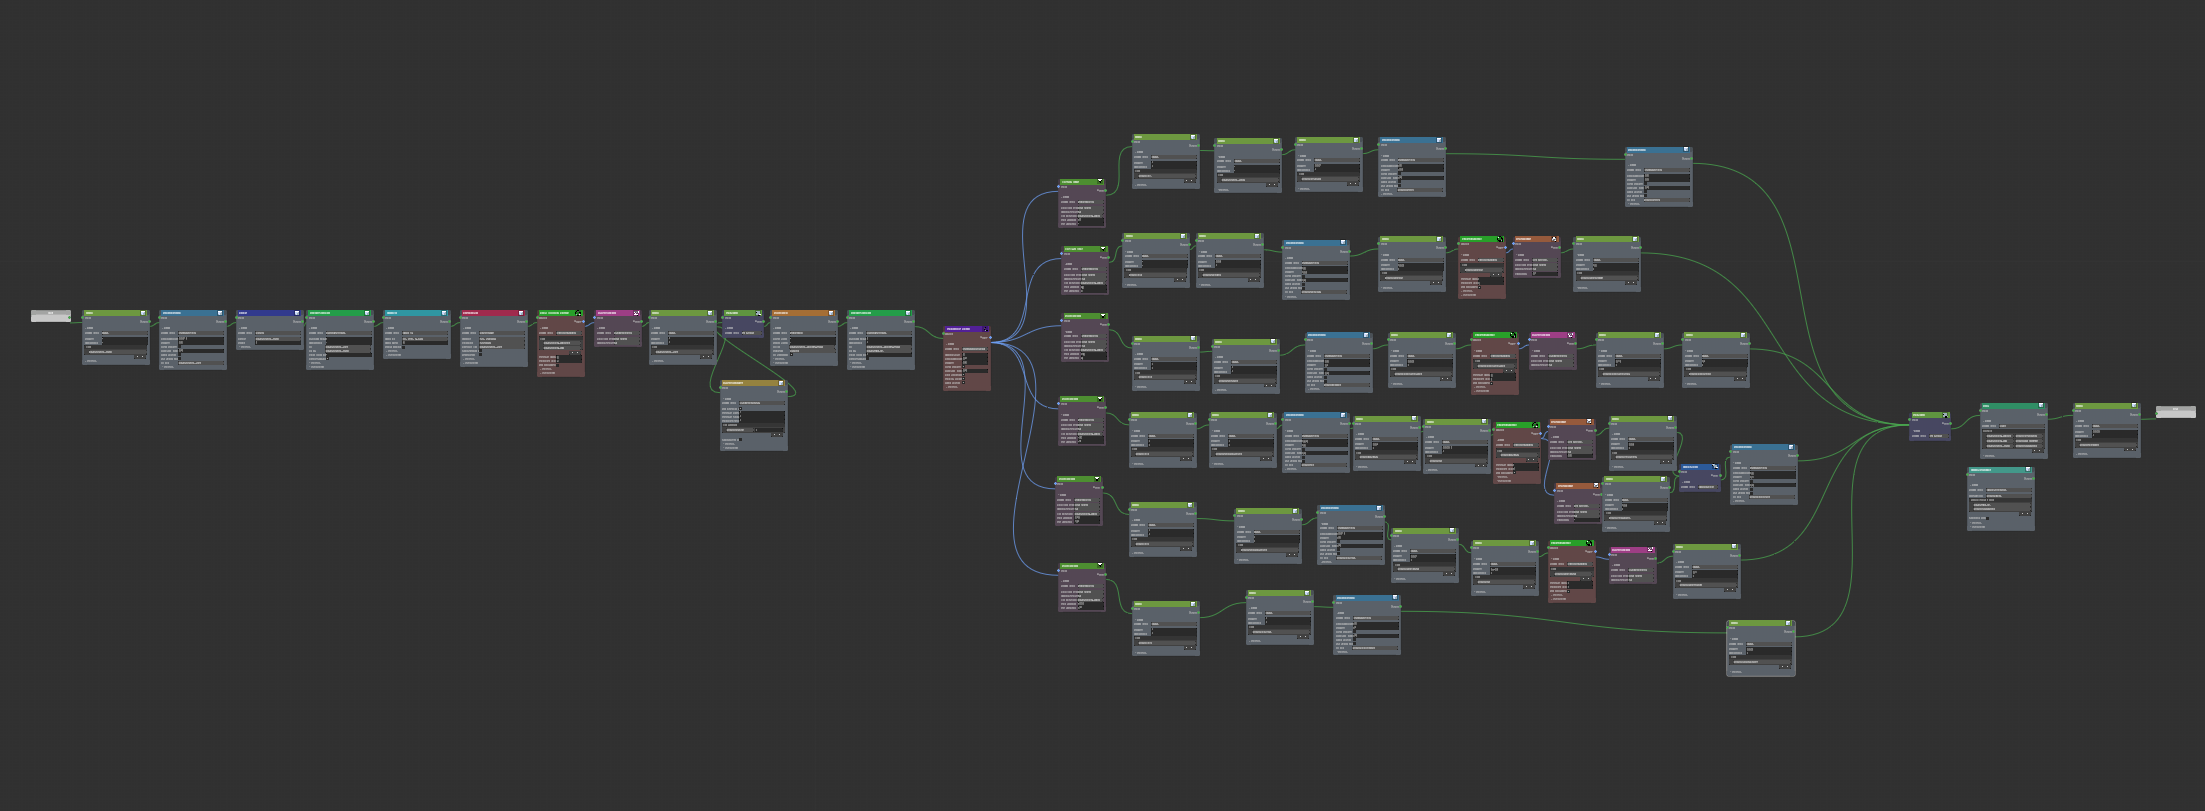
Simply put, the introduction of XNode and graphs in conjunction with new node operations such as splitters, filters and joiners worked to enable the generation of maps with regions. To come full circle, the real world application of this is readily playable on my itch in the form of the recent GMTK 25 Jam Submission my team and I made. The graph that I ended up making for that game jam had over 70 different nodes and was 384 x 384 tiles large, a total of 147,456 per layer and with four layers per tile, a total of 589,824 different tile types generated in less than three seconds in a browser- proving the system could handle production-scale complexity under jam constraints. Having just looked at some other graphs in the traversal section, look at the behemoth we ended up using.

So I was incredibly proud of not only getting this working, but having it work under such pressure. But as they say now is the youngest you'll ever be and now is the worst my random generator will ever be, as I also cannot wait to continue to push the random generator further and make even cooler maps.
Future Plans
So what's next? The first thing I am going to tackle is how layers work. I want users to be able to add their own layers, which I think requires, in a weird way, to make the generator 3D? As there if there is no set number of layers the z axis could stretch infinitely, so I think at that point the generator will be a 3D generator that's meant to be rendered in 2D. The main reason for this change is I need to add two new layers at least and I feel like its a good opportunity to look into the system and future proof it. Also if I do it right, I might be able to expand its use cases. After that I hope to add meta-data and structures to the generator.
I'm sure one of those two will warrant another blog post, whenever I get to it.
But anyways thank you so much for getting this far! This has probably been one of the largest pieces of writing I've ever done on one of the most complicated features I've ever implemented. I tried to keep it technical but mainly architectural, so let me know how I did in the comments. I hope you enjoyed it and see you next time!