Creating a Compute Lighting System and Rendering Meshes into 2D Textures
When trying to overcome an obstacle, the combination of a lack of experience and a lot of determination can create solutions that work, but are unnecessarily complicated and time intensive. I don't know what to call these imperfect solutions other than the 'growing pains' of progress. And especially in game development these growing pains occur frequently. Code written when one isnt very experienced often requires rewriting or replacement with a more capable API. The worst I've heard is some developers have restarted their games several times from scratch, because of this problem. Although common pitfalls in game development and coding is in itself an interesting blog post, this one is about my game, Ingredient Pursuit and how it's lighting system fell victim to this problem, but I think at least in a cool or interesting way.
The Original Problem
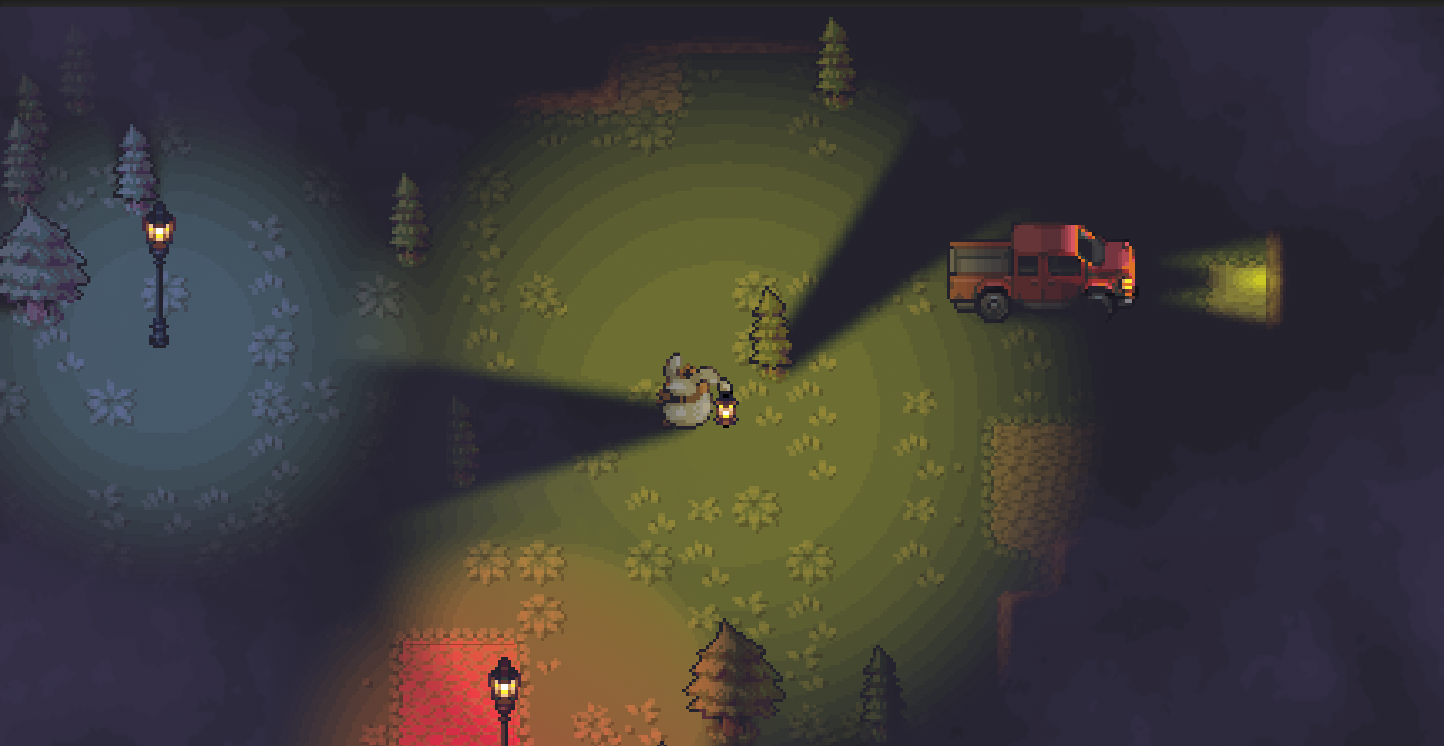
Firstly, what is Ingredient Pursuit? It's a game a couple of my friends and I made and submitted for the Game Maker Toolkit 2024 Game Jam in August. It was a four day jam with the theme "Built To Scale." Our team decided that we'd fit the theme by making a game that focused on scaling the size of a lantern light that could either reveal enemies or ingredients to forage. And as you can see below the resulting lighting looked alright.
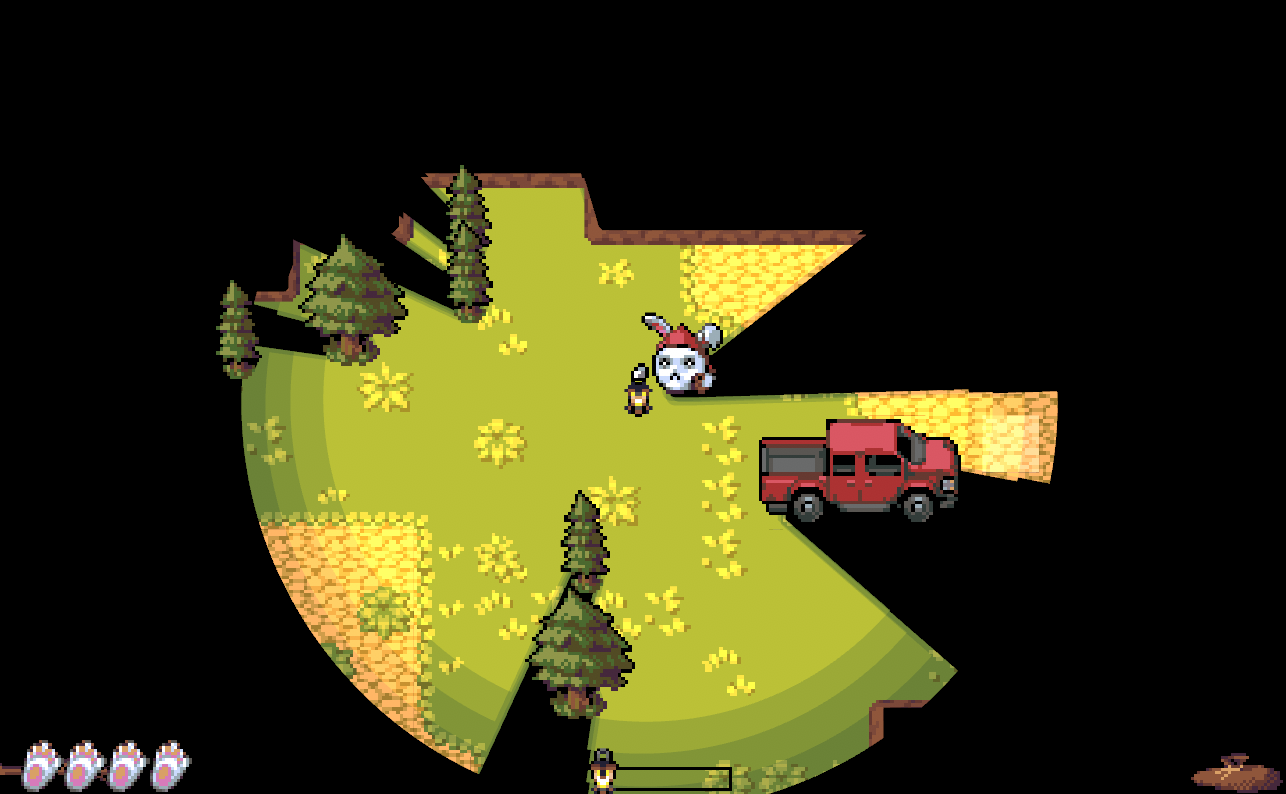
It is definitely less appealing than the first picture, especially due to the high contrast and lack of partial shadows on the trees or truck, I know. But I was amazed that we even managed to pull this off in four days, since this is using none of Unity's built-in lighting engine. Which was a decision born more of panic and these 'growing pains' than us trying to show off.
The reason was mainly that it was the first time any of us were using MoreMountain's TopDownEngine Package, a expansive package than encompasses most of the boiler-plate code that you can imagine you might need in a 2D Game: inventory, player controllers, AI, scene transitions, etc. So in order to speed things up and avoid starting from scratch, we grabbed their basic example scene, that had all of that boiler-plate set up already, and started from there. That approach worked great, up until the point in development that I tried to add the lighting to the lantern then quickly learned that the Unity project wasn't using the Universal Render Pipeline (URP) that Unity requires for their 2D lighting. So I switched the project over and quickly realized that change broke everything in the scene (which if you're curious, makes everything in the scene becomes a bright pink rectangle). And since I don't have a lot of experience debugging issues with converting scenes to work with different render pipelines (Also I'm sure TopDownEngine does works with URP, probably just not that scene), and at that moment I didn't feel I had the time to figure out the problem so I came up with a hacky solution to avoid URP and Unity's 2D Lighting.
The Game Jam Solution
That hacky solution was to try and take the lighting I had seen in another TopDownEngine example scene and adapt it to my problem. That scene had a lighting system that seemingly used raycasting to create light wherever the player could see, which was perfect for my implementation as long as I could make everything unseen dark. The class used to accomplish this is called MMVisionCone2D, which used raycasting to create a mesh that resembles the shape of a light. The example scene used this by then applying a shader to that mesh to make it look like a light. Luckily, this was just what I needed as it covered all of our lighting issues, but not all of our shadow issues. But as luck might have it I remembered a tutorial on UI masking shaders that I had watched years ago and decided to try and apply those to this project. Masking is the process of making a hole in one object based of the shape of another, a.k.a a circle mask would make a circle shaped hole in whatever it was masking. Thus I made a giant black "shadow" UI object above the entire game map and then applied that UI Mask shader to the MMVisionCone2D created mesh, so there was literally a light shaped hole in the shadow object. I then also applied that shader to objects that could be raycasted to by the lantern so that they could be seen too. This came with many limitations, but it was certainly enough for the Game Jam and was unique and good looking enough for us to score pretty highly on Style (#628 out of 7,598). In fact it was much more successful than we thought it would be and combined with the fact that it was a blast to make, the team decided to try and polish it up for a release on steam, but that of course meant polishing up the lighting system too.
Revisiting The Lighting System
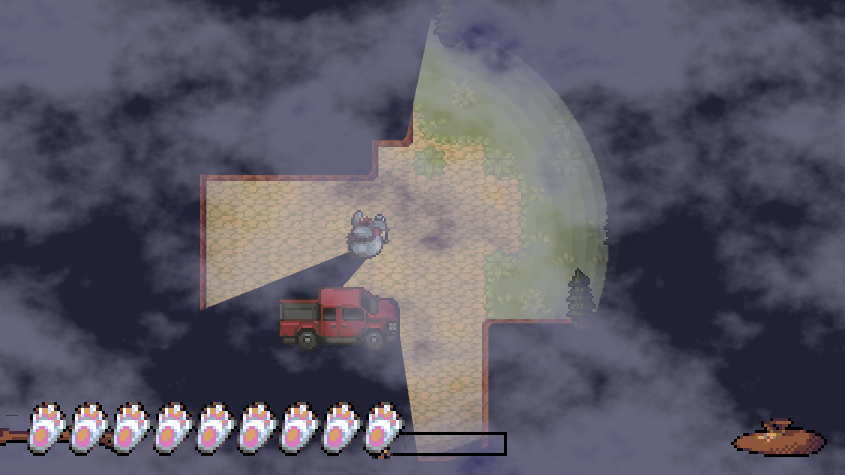
So bear with me and I try to quickly summarize how I tried to fix the lighting system and how that lead to me trying to render meshes into textures, and trust me the narrative gets a little foggy, literally, as I wanted to add fog to make the forest feel more mystical and scary. This was actually pretty easy it was a simple shader that took in a position and radius to create a hole in a fog texture where the player was, but I quickly realized it wasn't versatile enough. Eventually I wanted to make multiple lightsources, which was simple with my UI mask shaders, but not with my fog shader. So I switched the fog to use compute shaders which I was confident could handle multiple positions and radii to create many holes in the fog.
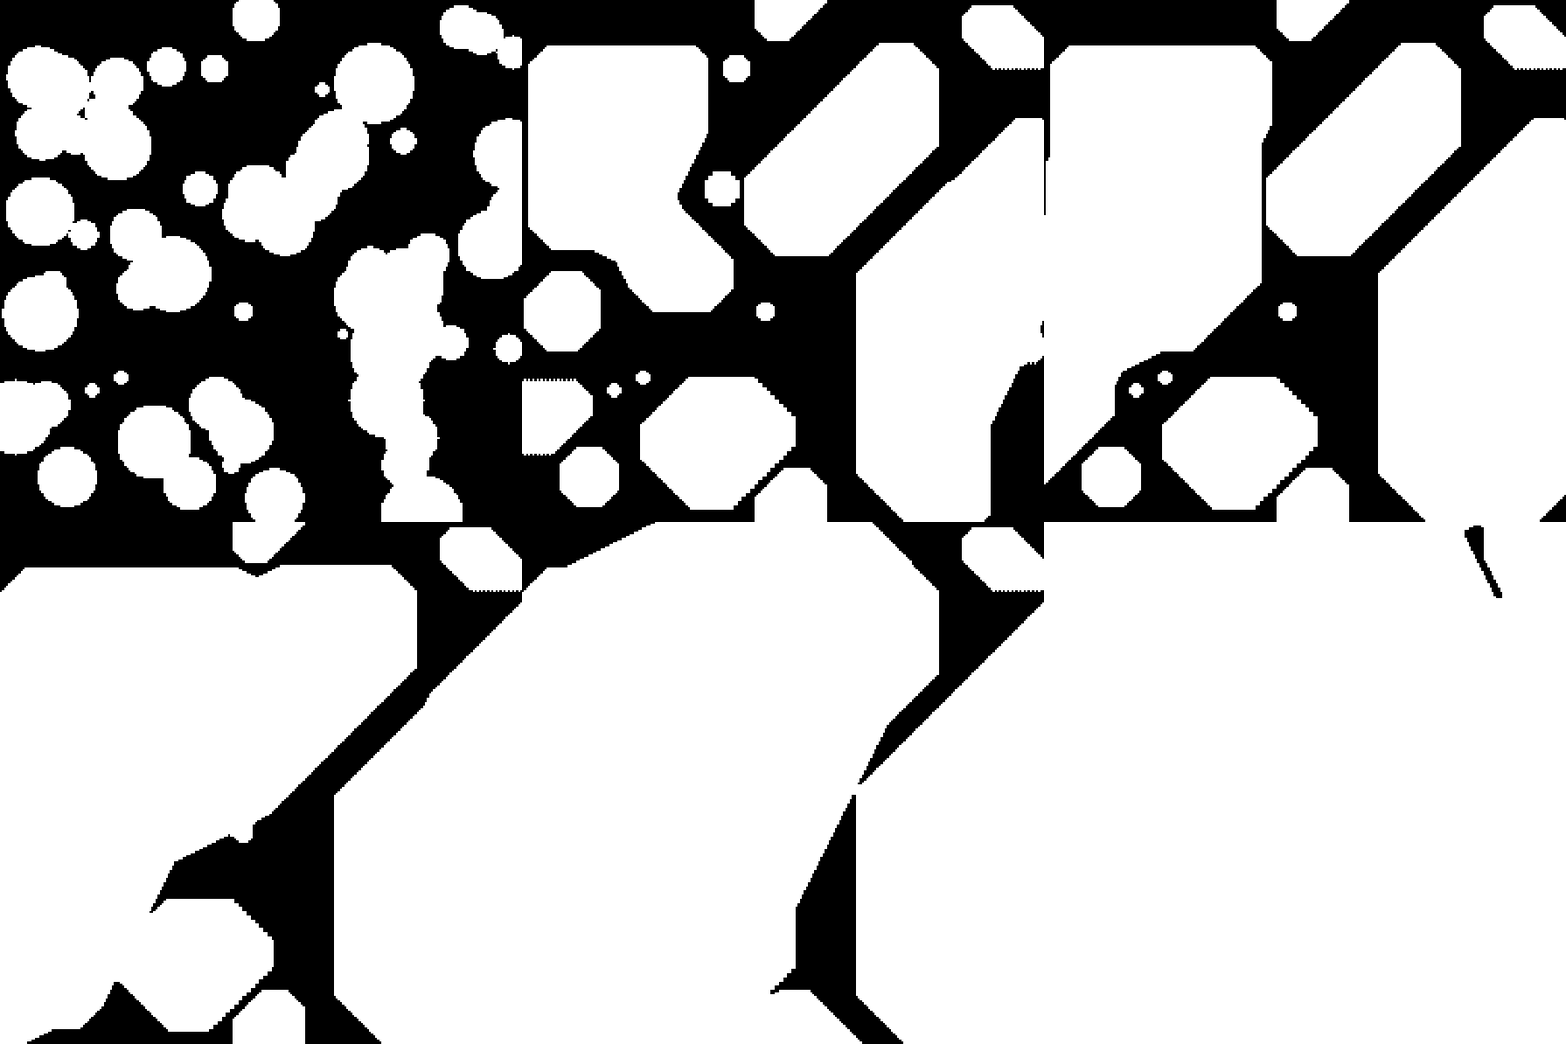
I had no clue how to use compute shaders, but I had always been extremely interested in them. Effectively what they are is a way to run non-graphics code on a GPU by writing it in a shader language, in Unity's case High Level Shader Language or hlsl. This is really helpful as some algorithms are very slow on the CPU, but if you were to compute it in the GPU on a compute shader it could be 1000 times faster. Theres a really great video by Sebastian Lague about them I recommend checking out. So, in reality I just really wanted an excuse to use compute shaders, so I just went for it and eventually made a class that processed a stack of algorithms that kind of worked. They took in a list of data classes that had a radius and a position that used that to cut a hole in the fog. I then ran Cellular Automaton and Gaussian Blur on that and boom, a decent fog texture. I then plugged that texture into a shader as a mask and boom, a decent fog effect.
I then took that system and thought if I had a position and a radius, then why don't I just take that and add color information, wouldn't that be a light source? This was perfect as I needed a way to render the light better as well, not just add fog. So I wrote a new stack of compute shaders to do that, which worked alright. But the main issue I figured out as soon as I had finished was they had no information about objects nearby, just positions, radii, and colors. So no shadows could shown very accurately. I was stumped if I should just abandon all the work to this point or if I should keep pushing and thats when I had an idea. And now this is finally where the MMVisionCone2D meshes come back in and the crux of this blog post.
Rendering Meshes into 2D Textures
So my idea to render shadows in compute shader textures was I wanted to take the MMVisionCone2D's (MMVC) mesh and compress that into a Render Texture then remove the light texture I generated from the lightsources at the shadows created by the MMVC. But to do that I needed an algorithm to render the 2D mesh through a compute shader to a texture. Here is the nitty-gritty of that process.
Using 'Raycasting'
My first approach I tried was using an algorithm I found in a stack overflow post called "raycasting". The raycasting algorithm given one point and the vertices of a polygon can tell you if that point is inside or outside that polygon. It does so by have a "ray" or line go directly left of the given point to the edge of the screen, if that ray intersects with the polygon an odd amount of times its inside the shape, else its outside the shape. Try it on a piece of paper, its really interesting how no matter the shape this is still true. Although this an algorithm for a polygon, not a mesh, you could easily preprocess the mesh to just get the vertices on the bounds of the object to effectively create a polygon, so that was no real issue. So, I thought this was going to be a relatively easy solution, but what I did not realize is that you have to iterate through all vertices in the mesh to figure out if the "ray" would intersect in a line between vertices. Now imagine running that each frame and you can see why in the video below my GPU hits 90% usage. In hindsight the Axis-Aligned Bounding Box (AABB) optimization I use later could also be applied to the algorithm likely to make it viable, but I moved on.
Mesh to Texture Running using Raycasting and Its GPU Lag
Using 'Triangles' and AABBs
I found this post on the computer graphics forum of Stack Exchange and it was the key that lead to the approach being possible. The crux of it is, you want to find if a point is inside of a mesh or not, you check to see if its in any triangle in that mesh. That much is simple, but doesn't solve the problem of needing to iterate through all the triangles in that mesh. Here comes the genius part of this algorithm which is you pre-process each triangle in the mesh before you hand it to the compute shader so that you only have to search if its in the nearby triangles not every triangle. You do this by drawing the AABB around each triangle, which if you're wondering is the minimum spanning rectangle (in 2D) that can encapsulate the triangle.
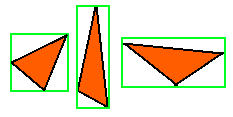
Then you break up texture into rectangles of the same size, lets call these grid cells. Since each of these grid cells are the same size, if you take any pixel on the texture you can figure out which grid cell that point is in, in O(1) complexity, just divide by the cell size and floor it. So now if you take each triangle and its AABB then calculate which grid cells overlaps with that AABB, and then store that information in at an index in a list corresponding to that grid cell, you can in O(1) complexity from a point, locate each triangle in its grid cell. This optimization dropped the GPU usage of this compute shader from 90% in that last example to ~20%.
A bug in the compute buffers that lets use see the grid cells
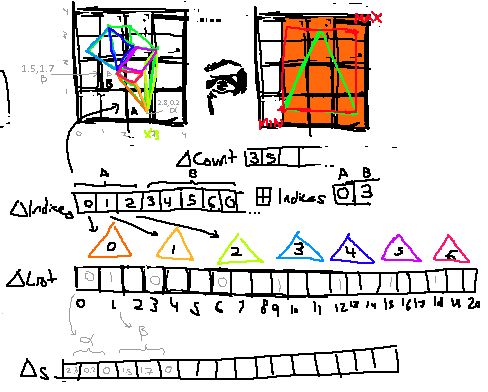
But this optimization means there is a lot of pre-processing outside the compute shader to prepare that data so that the compute shader can access it easily, do despite it being a "GPU Optimization", its really just shifting the work to CPU to do it on the front end. As you can see in the main of the compute shader its actually really simple.
[numthreads(8, 8, 1)]
void CSMain(uint3 id : SV_DispatchThreadID)
{
    int2 pixelCoord = int2(id.xy);
    if (pixelCoord.x >= textureSize.x || pixelCoord.y >= textureSize.y)
        return;

    // Grid cell location
    int cellX = pixelCoord.x / gridCellSize;
    int cellY = pixelCoord.y / gridCellSize;
    int gridWidth = textureSize.x / gridCellSize;
    int cellIndex = cellY * gridWidth + cellX;

    int startIdx = GridIndices[cellIndex];
    int triangleCount = TriangleCounts[cellIndex];

    bool inside = false;
    [loop]
    for (int i = 0; i < triangleCount; i++)
    {
        int index = TriangleIndices[startIdx + i] * 3;

        // Extract only the 2D coordinates from each triangle
        float2 v0 = TriangleBuffer[index].xy;
        float2 v1 = TriangleBuffer[index + 1].xy;
        float2 v2 = TriangleBuffer[index + 2].xy;

        if (IsPointInTriangle(pixelCoord, v0, v1, v2))
        {
            inside = true;
            break;
        }
    }

    OutputTexture[pixelCoord] = inside ? insideColor : outsideColor;
}
Finishing Touches
Mesh Shadows working Great, but using a bad Render Texture Format
After I got that working it was only a matter of fixing the color mixing, which was a little harder than I thought it would be. Not because of the actual color mixing code, as I'm simply doing additive blending, but I had an issue with the render texture format that was messing up the colors. As soon as I switched all of my textures to the format ARGB64, I finally got the results I was look for.
Color Blending and Shadows Finally Working Together!
Conclusion
Although the game isn’t finished, I’m much prouder of what I accomplished making these graphics compared to how I would of felt if I used Unity’s built-in 2D lighting. But, I wouldn't suggest trying to implement this system for lighting yourself as it hard to implement and using render textures and compute shaders leaves the opening for memory leaks, which is not a problem that you often run into in C# development. But I definitely think learning compute shaders was well worth it, I can now see how you could easily use these techniques to make very cool shaders especially like creating a movement texture as I saw in this youtube video by Aarthifical. So while I don't feel that this implement isn't the best in the world, it still does what I want and taught me a powerful new tool. So, I'm pretty happy about it despite the extra time used. But more importantly if you found the game interesting and want to be notified about the release of the game or just liked the blog post, I hope you sign up for my site mailing list by making an account. Thanks for reading!


